How to set up GSC & track performance
Learn how to set up Google search console and how to use Google search console for optimizing your website.
Learn how to set up Google search console and how to use Google search console for optimizing your website.
Learn how to set up Google search console and how to use Google search console for optimizing your website.
Learn how to set up Google search console and how to use Google search console for optimizing your website.
Learn how to set up Google search console and how to use Google search console for optimizing your website.
Google is currently the largest search engine in the world, so it is fundamental to target Google to attract visitors to your website regardless of country. The tool you can use is GSC(Google Search Console), a free SEO tool provided by Google. The name changed from Google Webmaster Tools to Google Search Console in 2015.
Google Search Console lets you track your website's performance and provides a variety of metrics that can help you improve your search rankings. Therefore, it is an essential tool for all individuals/companies who want to increase organic traffic from Google searches or run a website.
This article introduces how to set up GSC and how to use GSC to improve your website and increase traffic from Google.
First, you need a Google account to use GSC. If you do not have an account yet, you need to create an account first. After logging in, click [Getting start] on GSC Home.
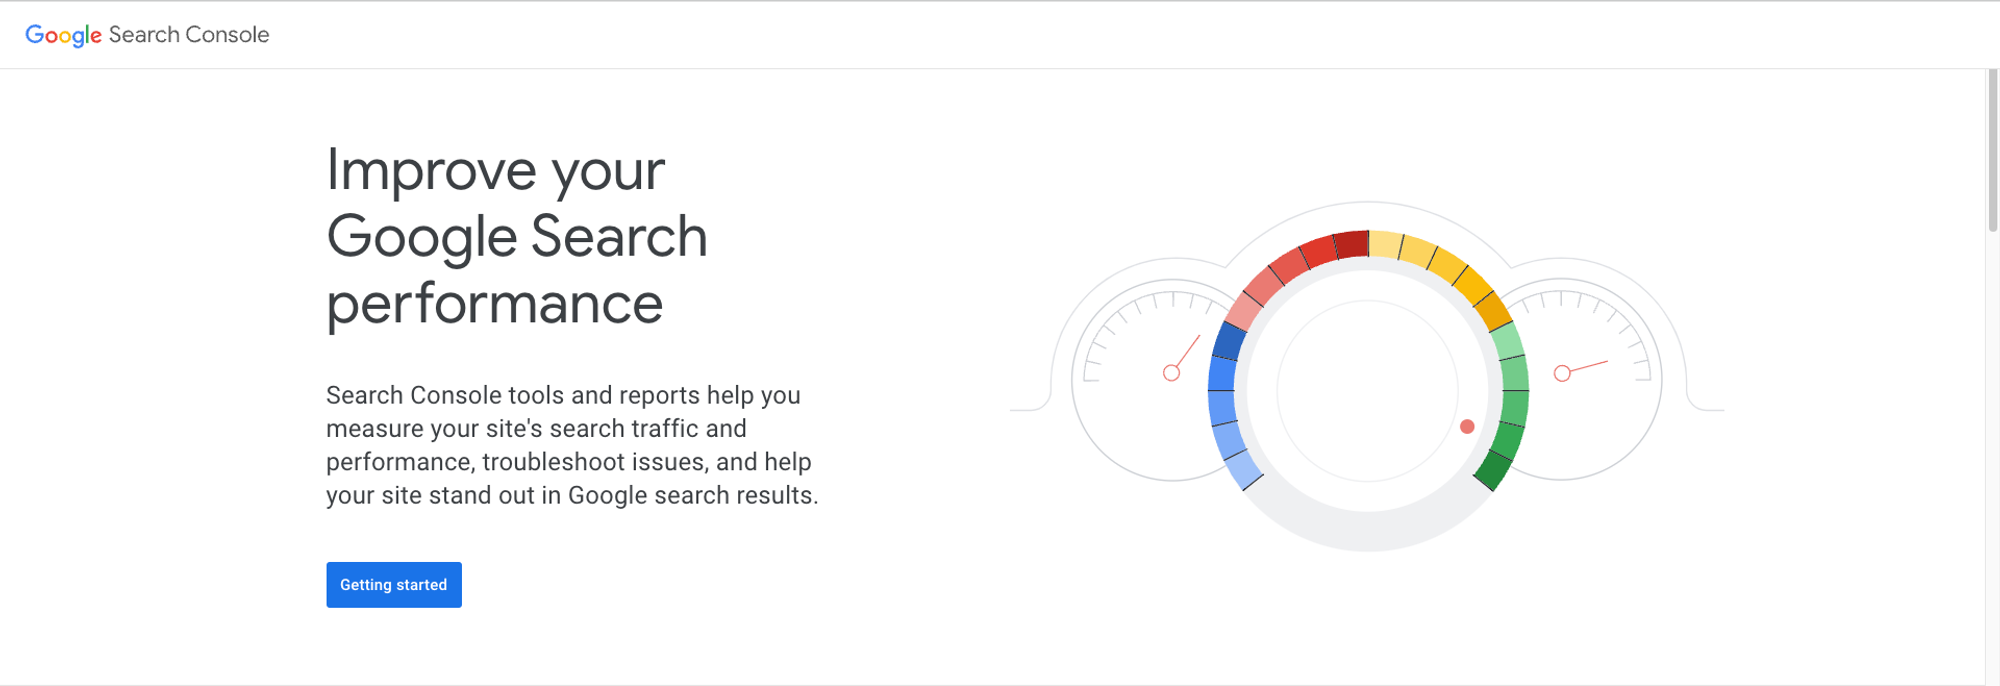 Start GSC
If this is your first time setting up GSC, you need to select the property type of the website you want to register as shown in the image below. At this time, you can select one of two types: “Domain” and “URL prefix”.
 GSC - Select Property type
Add domain
Adding a domain property will provide the most comprehensive view of your website’s information. You’ll get data from all URLs under the domain name, including all protocols, subdomains, and paths.
 Property - Domain type

BubbleShare TIP
If you add a property this way, you need to verify it through your DNS (Domain Name System) provider.
URL prefix
If you do not yet have DNS verification or are only viewing data for a specific section of your site, we recommend that you select the appropriate option to add the site. At this time, unlike the domain option, write the entire URL including all prefixes and click [Continue].
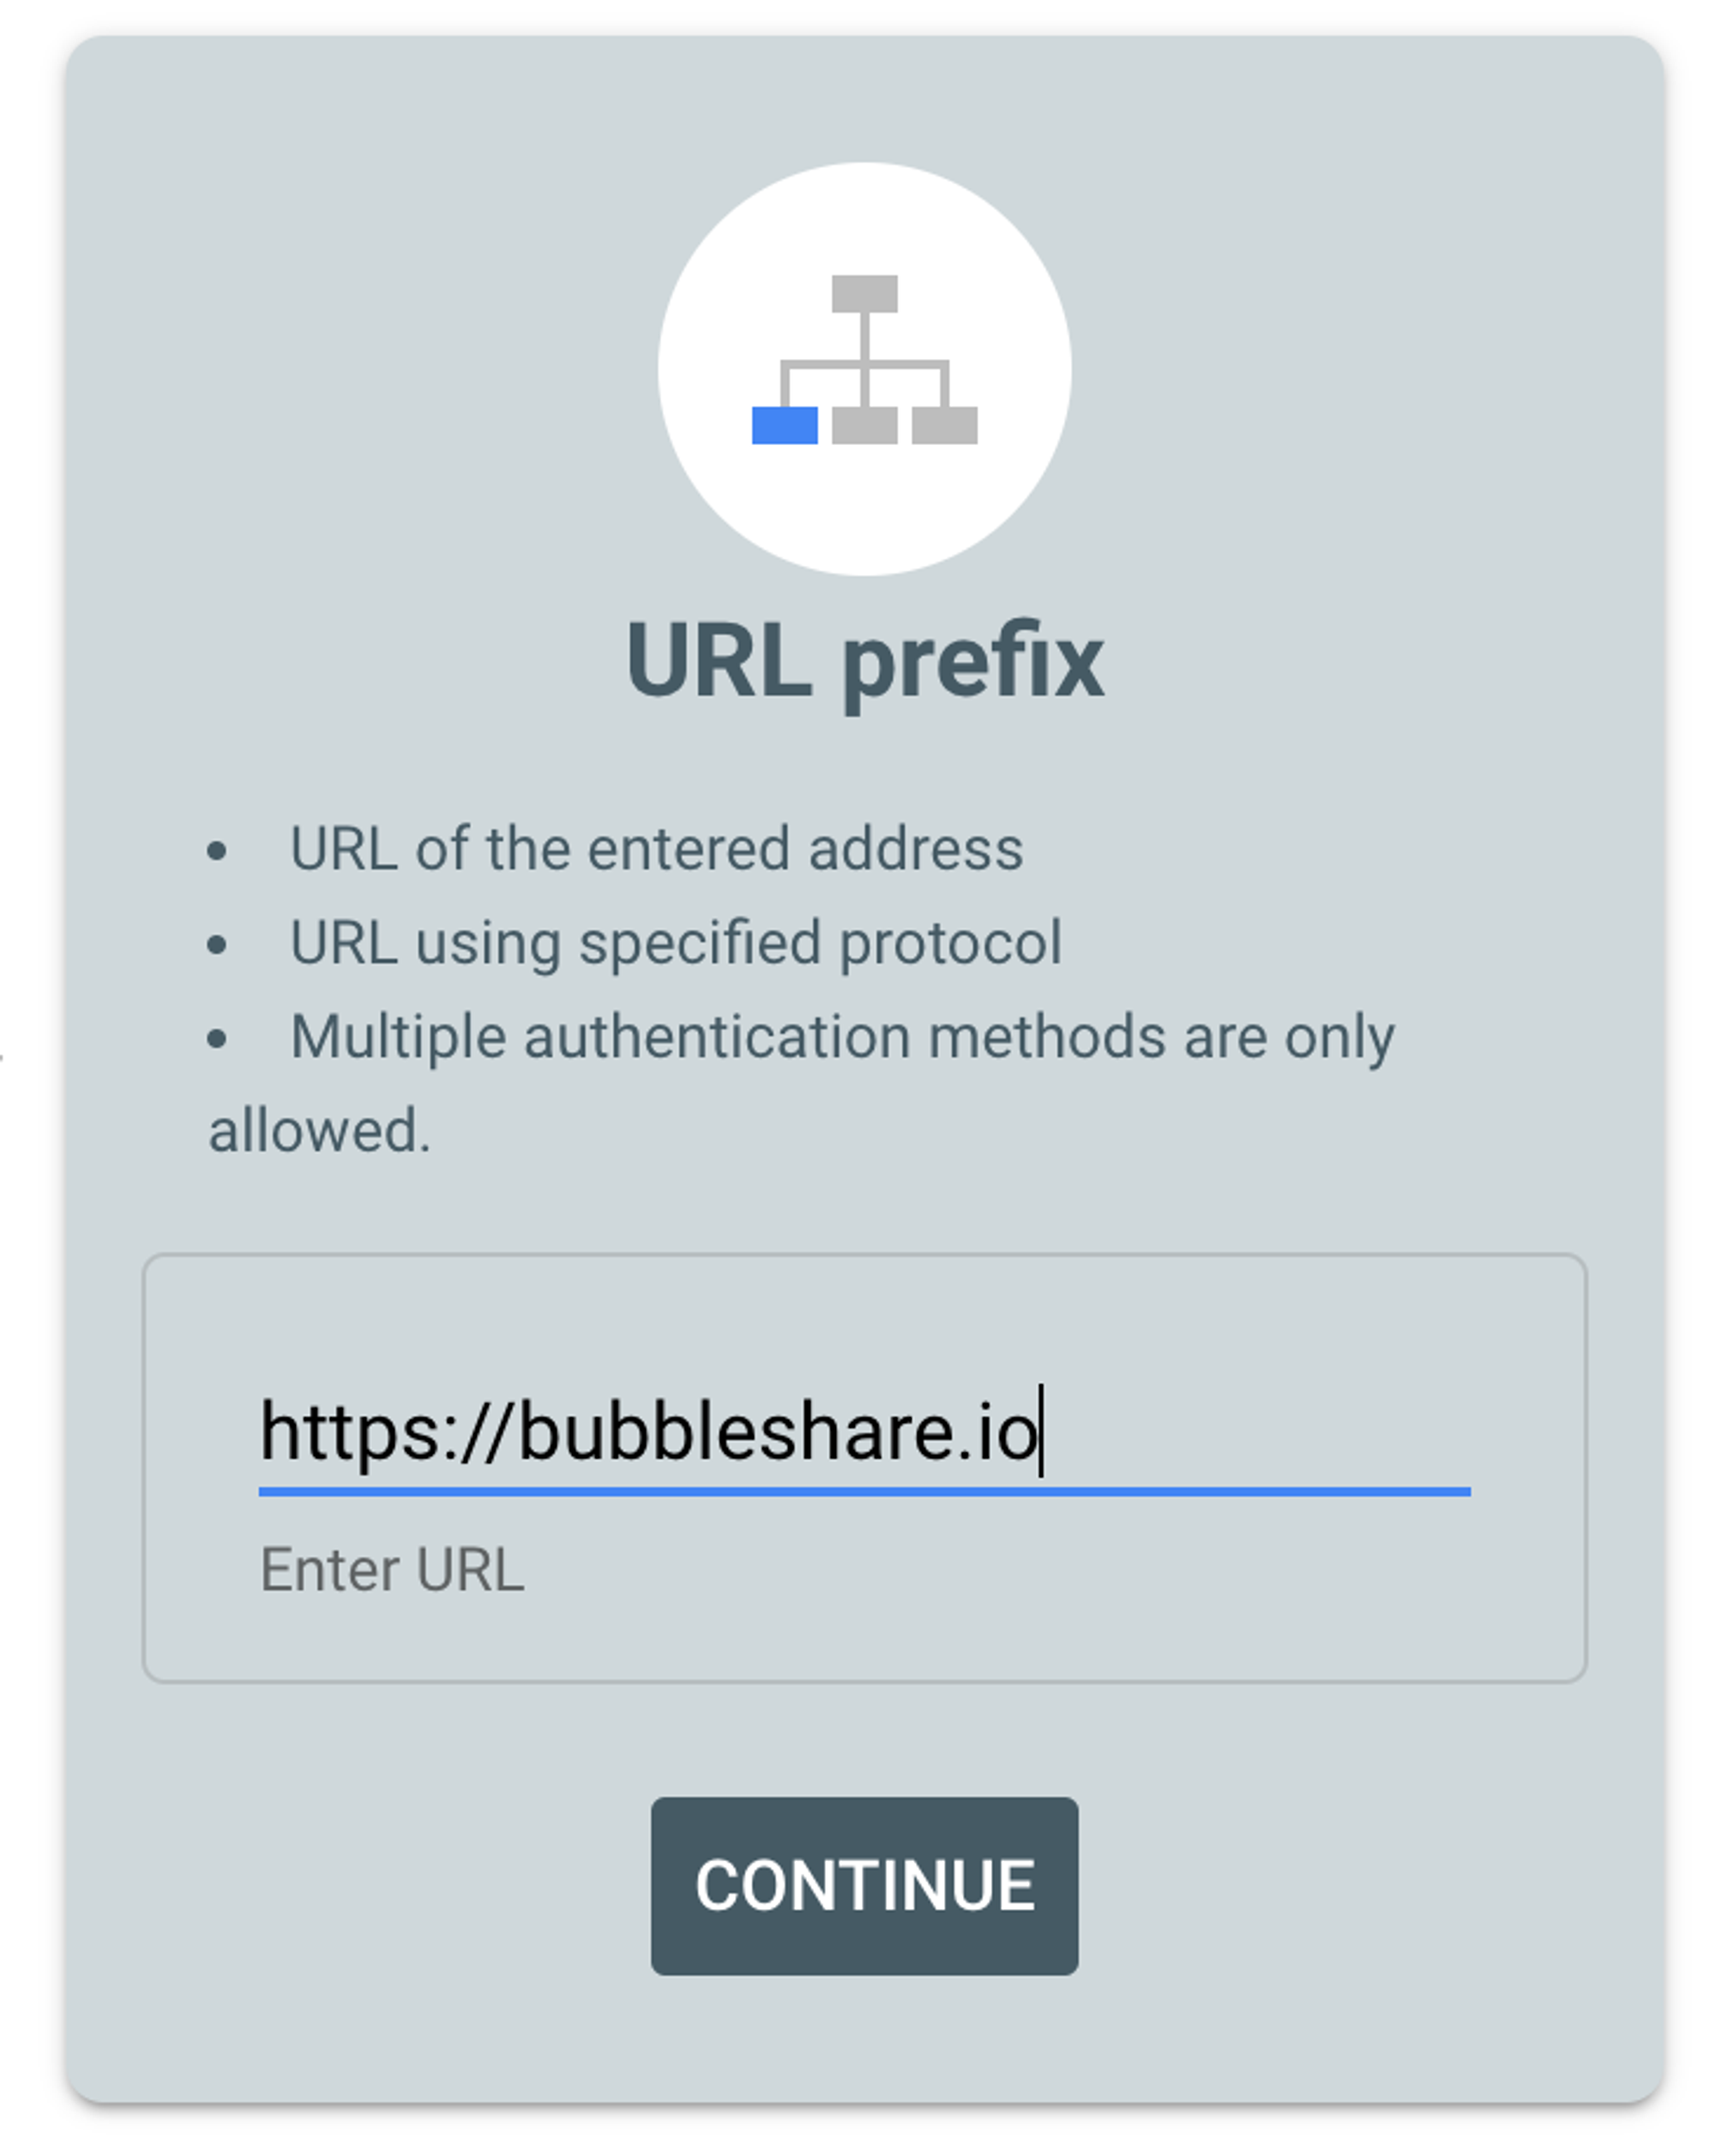 Property - URL prefix

BubbleShare TIP
In order to ensure GSC provides accurate data with URL-prefix properties, create a GSC property for each of the following four URLs:
After enter website address, verification of the owner of the website is required for data collection. Google provides various options for verifying. If you choose “Domain” type, verification is only possible in the “Domain name provider” format, and if you choose “URL prefix” type, you can select the desired verification method out of 5 types.
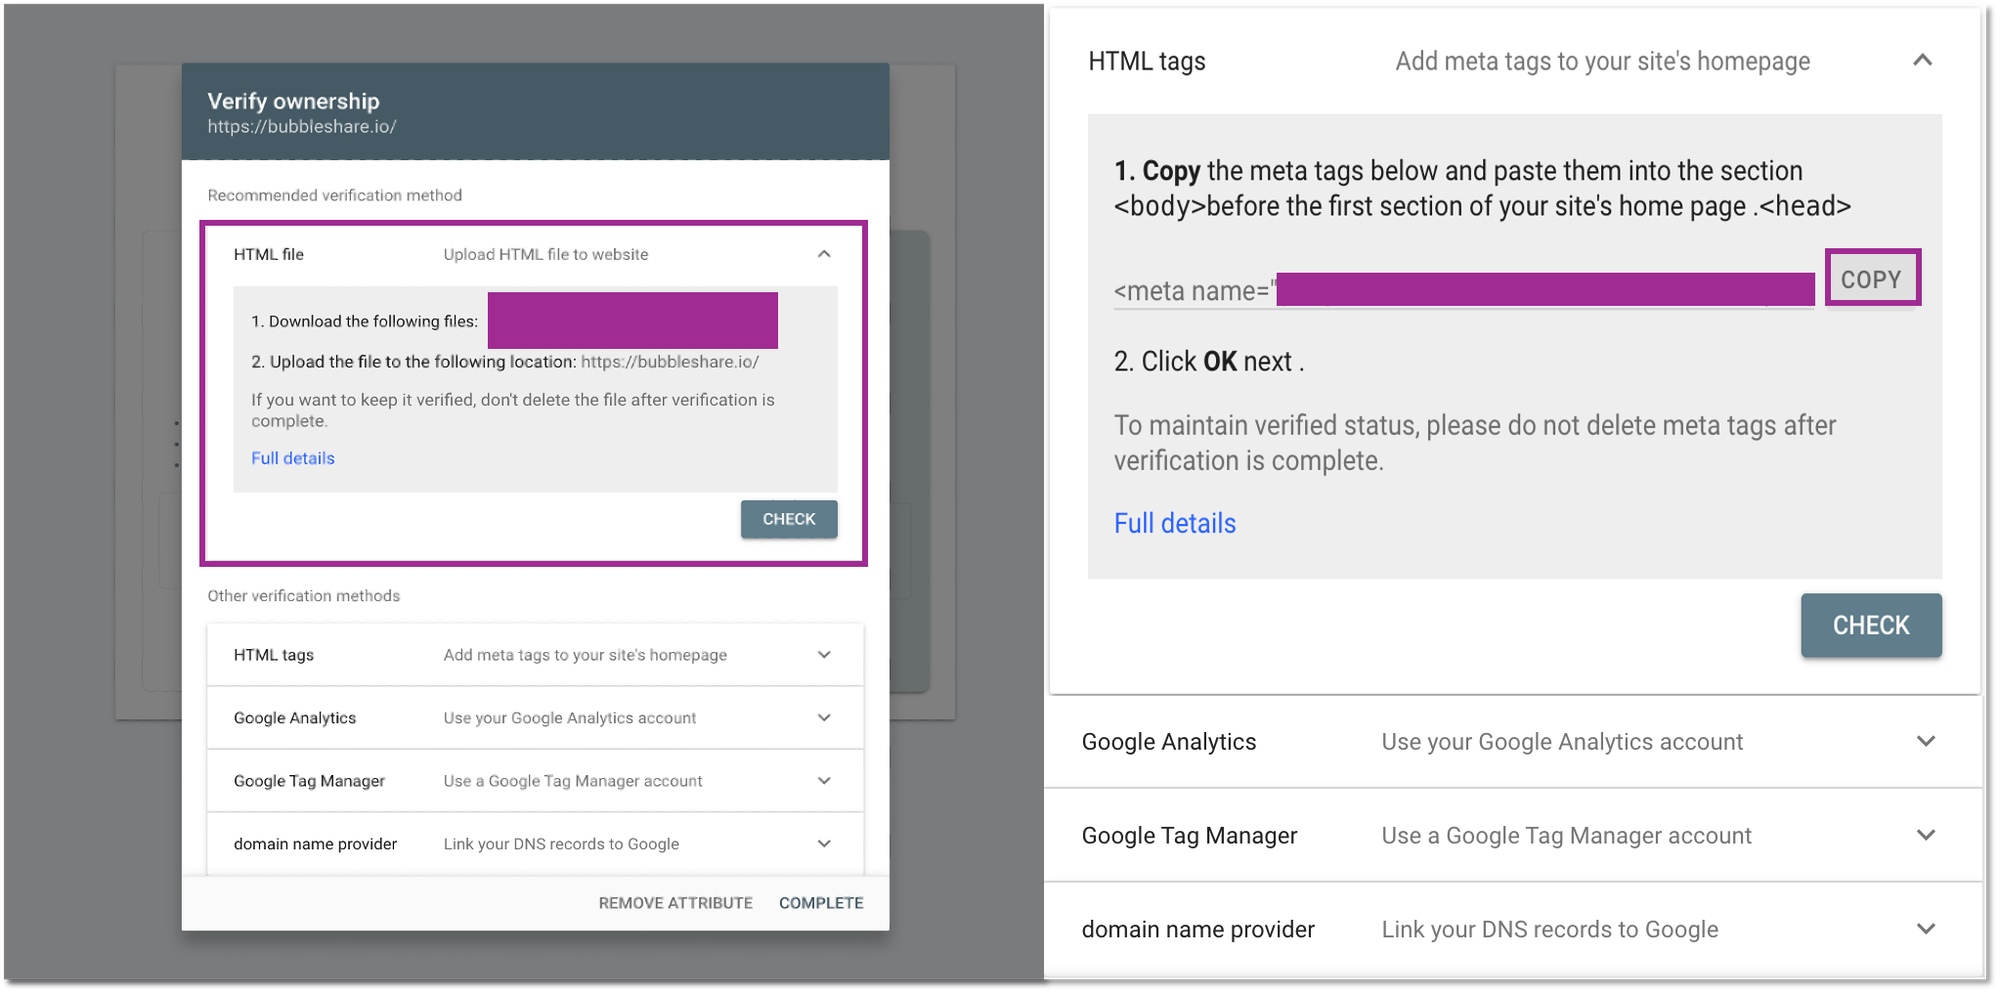 GSC - 5 verification methods
(If the property is registered using the domain method) How to verify the owner:
| Method | Description |
|---|---|
| Domain name provider | More complex, but is the only way to verify a Domain property. If your domain provider is listed in the verification wizard, then this is a simple process. Domain properties are useful because they include data for all protocol (http/https) and subdomain variations of your property. |
(If the property is registered using the domain prefix method) Five ways to verify the owner:
| Method | Description |
|---|---|
| HTML file upload | Relatively simple, but requires the ability to upload a file and publish it on your site at a specific URL. Might not be possible on a site hosting platform. |
| HTML tag | Relatively simple, but requires the ability to edit the HTML source code of your site's homepage. Might not be possible on a site hosting platform. |
| Google Analytics tracking code | Simple, if the page already has a Google Analytics tracking code for a Google Analytics account that you can access. If the page does not have a tracking code, you must add one (which may require creating a Google Analytics account if you don't already have one). |
| Google Tag Manager | Simple if the page already has a Google Tag Manager snippet for a Google Tag Manager account that you can access. If the page does not have a snippet, you must add one (which may require creating a Tag Manager account if you don't already have one). |
| Google Sites or Blogger account | Use the recommended method for each platform. |
| Domain name provider | More complex, but is the only way to verify a Domain property. If your domain provider is listed in the verification wizard, then this is a simple process. Domain properties are useful because they include data for all protocol (http/https) and subdomain variations of your property. |
After performing verification according to each procedure, click the [Check] button to complete verification. Verification takes approximately a few seconds to several minutes, and if completed successfully, you can see a completion pop-up as shown below. Now, the settings to use GSC are complete.
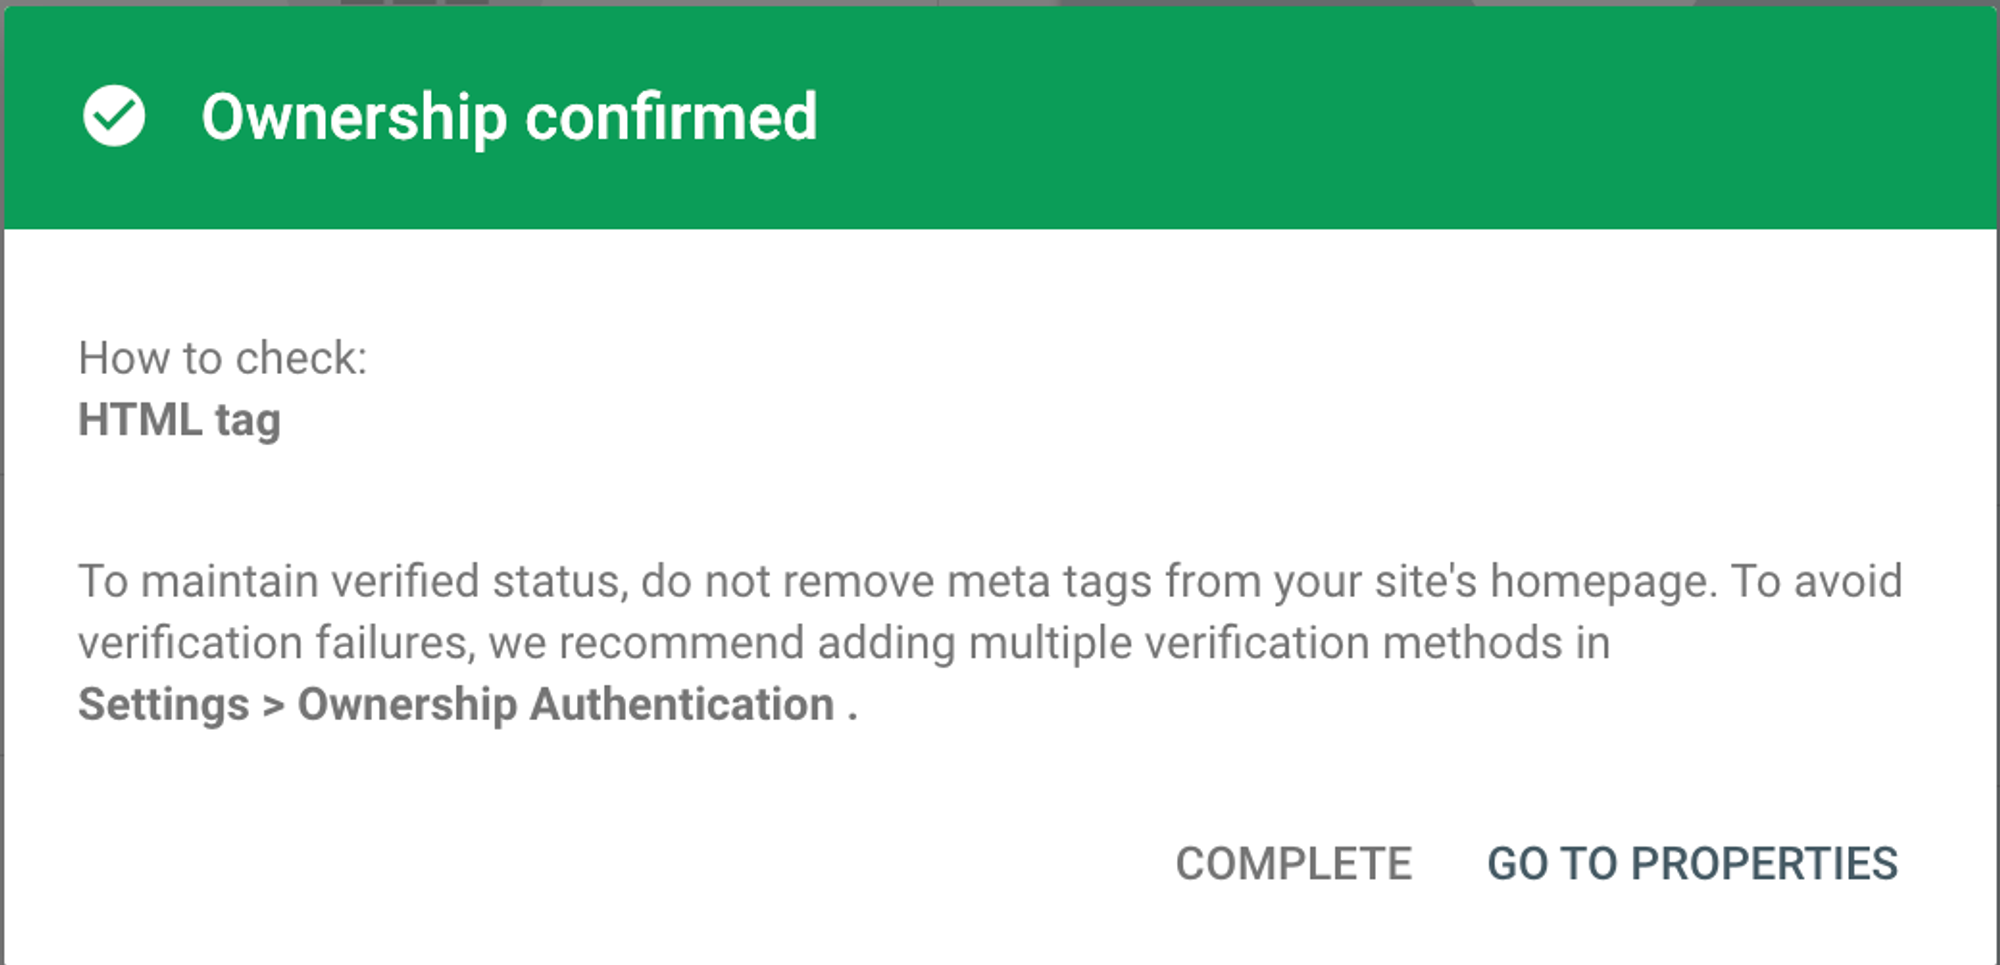 Ownership confirmed pop-up
If your website is registered, you can use GSC to optimize your website and content, also can check the indicators for increasing your content rank on Google SERPs. For this, introduce 4 method to utilize the main functions provided by GSC.
Even if a website is registered, it does not mean that you can immediately check your website data. Submitting a site map to GSC is essential to check whether your website is well optimized and how it is performing in Google SERP. Submitting a sitemap is very simple.
Even if website is registered, it does not mean that you can immediately check data. Submitting a site map to GSC is essential to check whether your website is well optimized and how it is performing in Google SERP. Submitting a sitemap is very simple.
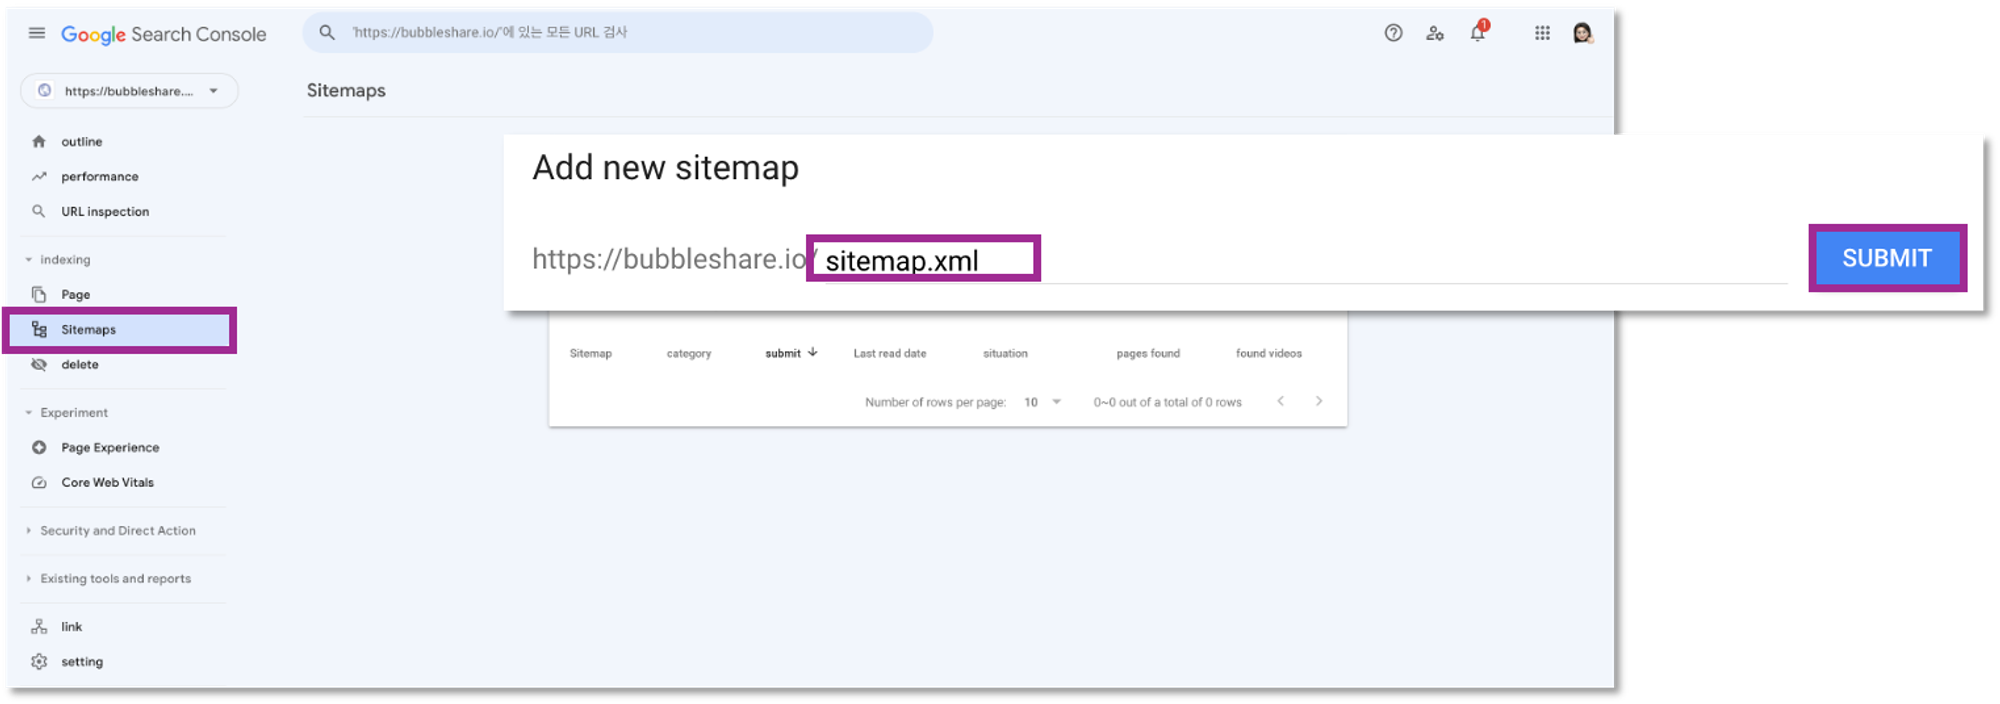 Submit Sitemap
After pressing Submit, if it has been submitted properly, you will see the following pop-up. If there is an issue with registration, you can check the related issues in detail in the submitted sitemap section. In the case of our site shown below, the sitemap has just been submitted, so the indexing is not complete.
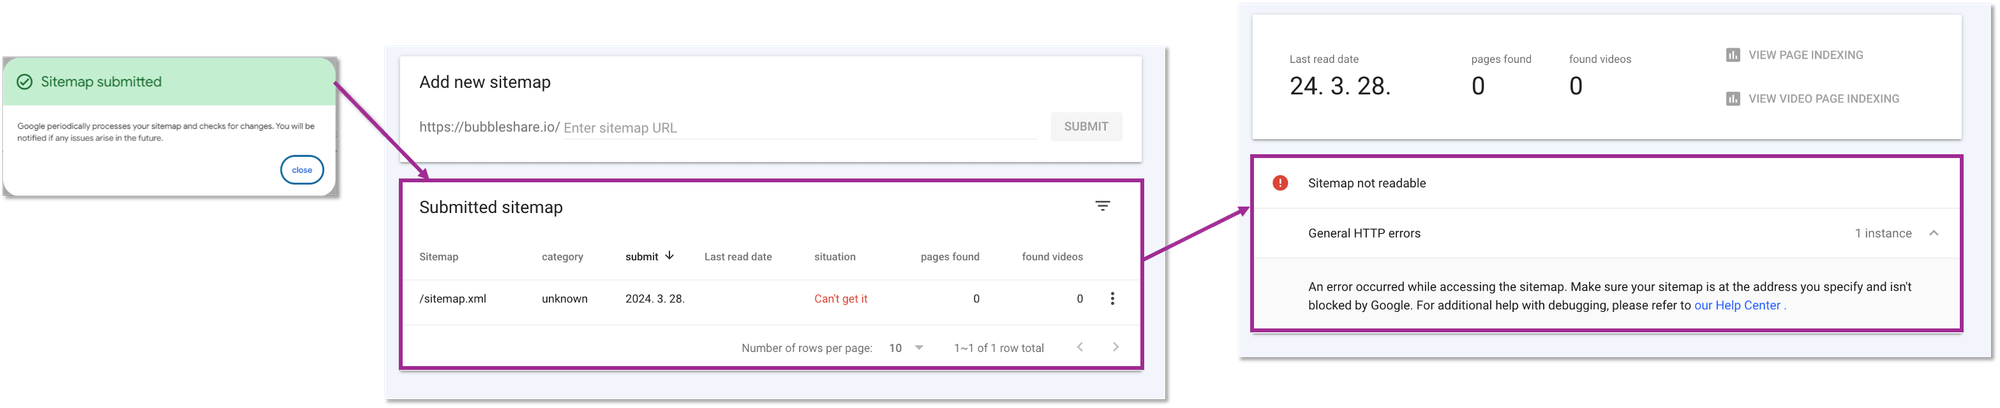 Submitted Sitemap status
Enter a specific URL to see how Google indexes that page and identify any issues that may affect its visibility in search results. You can use this function simply by following the steps below.
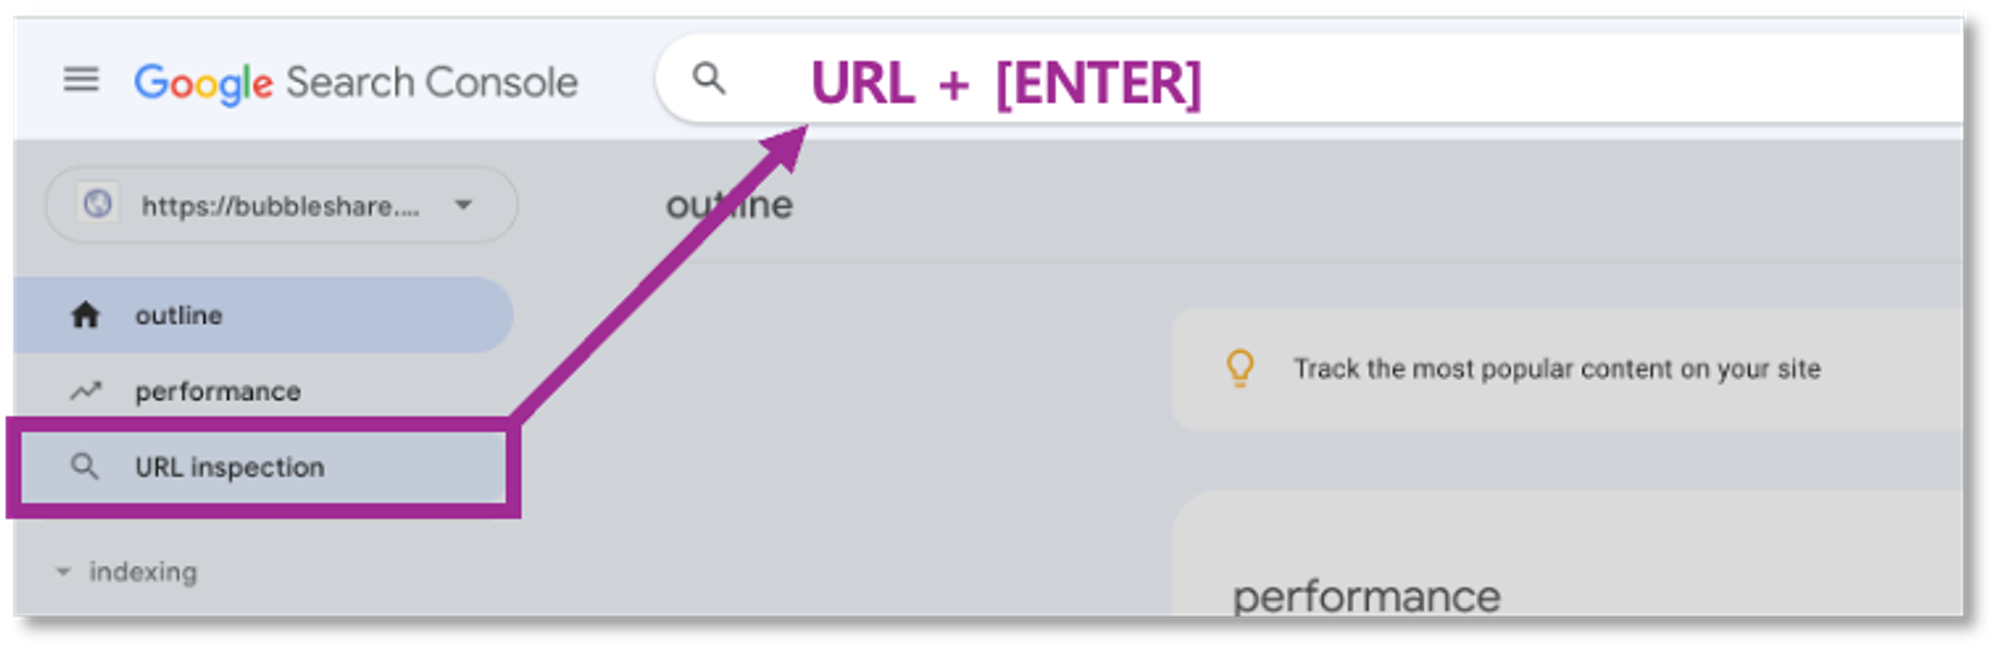 URL Inspection
Afterward, Google conducts a brief search to test whether the URL can be indexed. If you find that the page you searched for is not indexed, you can request that the page be searched on Google by [INDEX CREATION REQUEST].
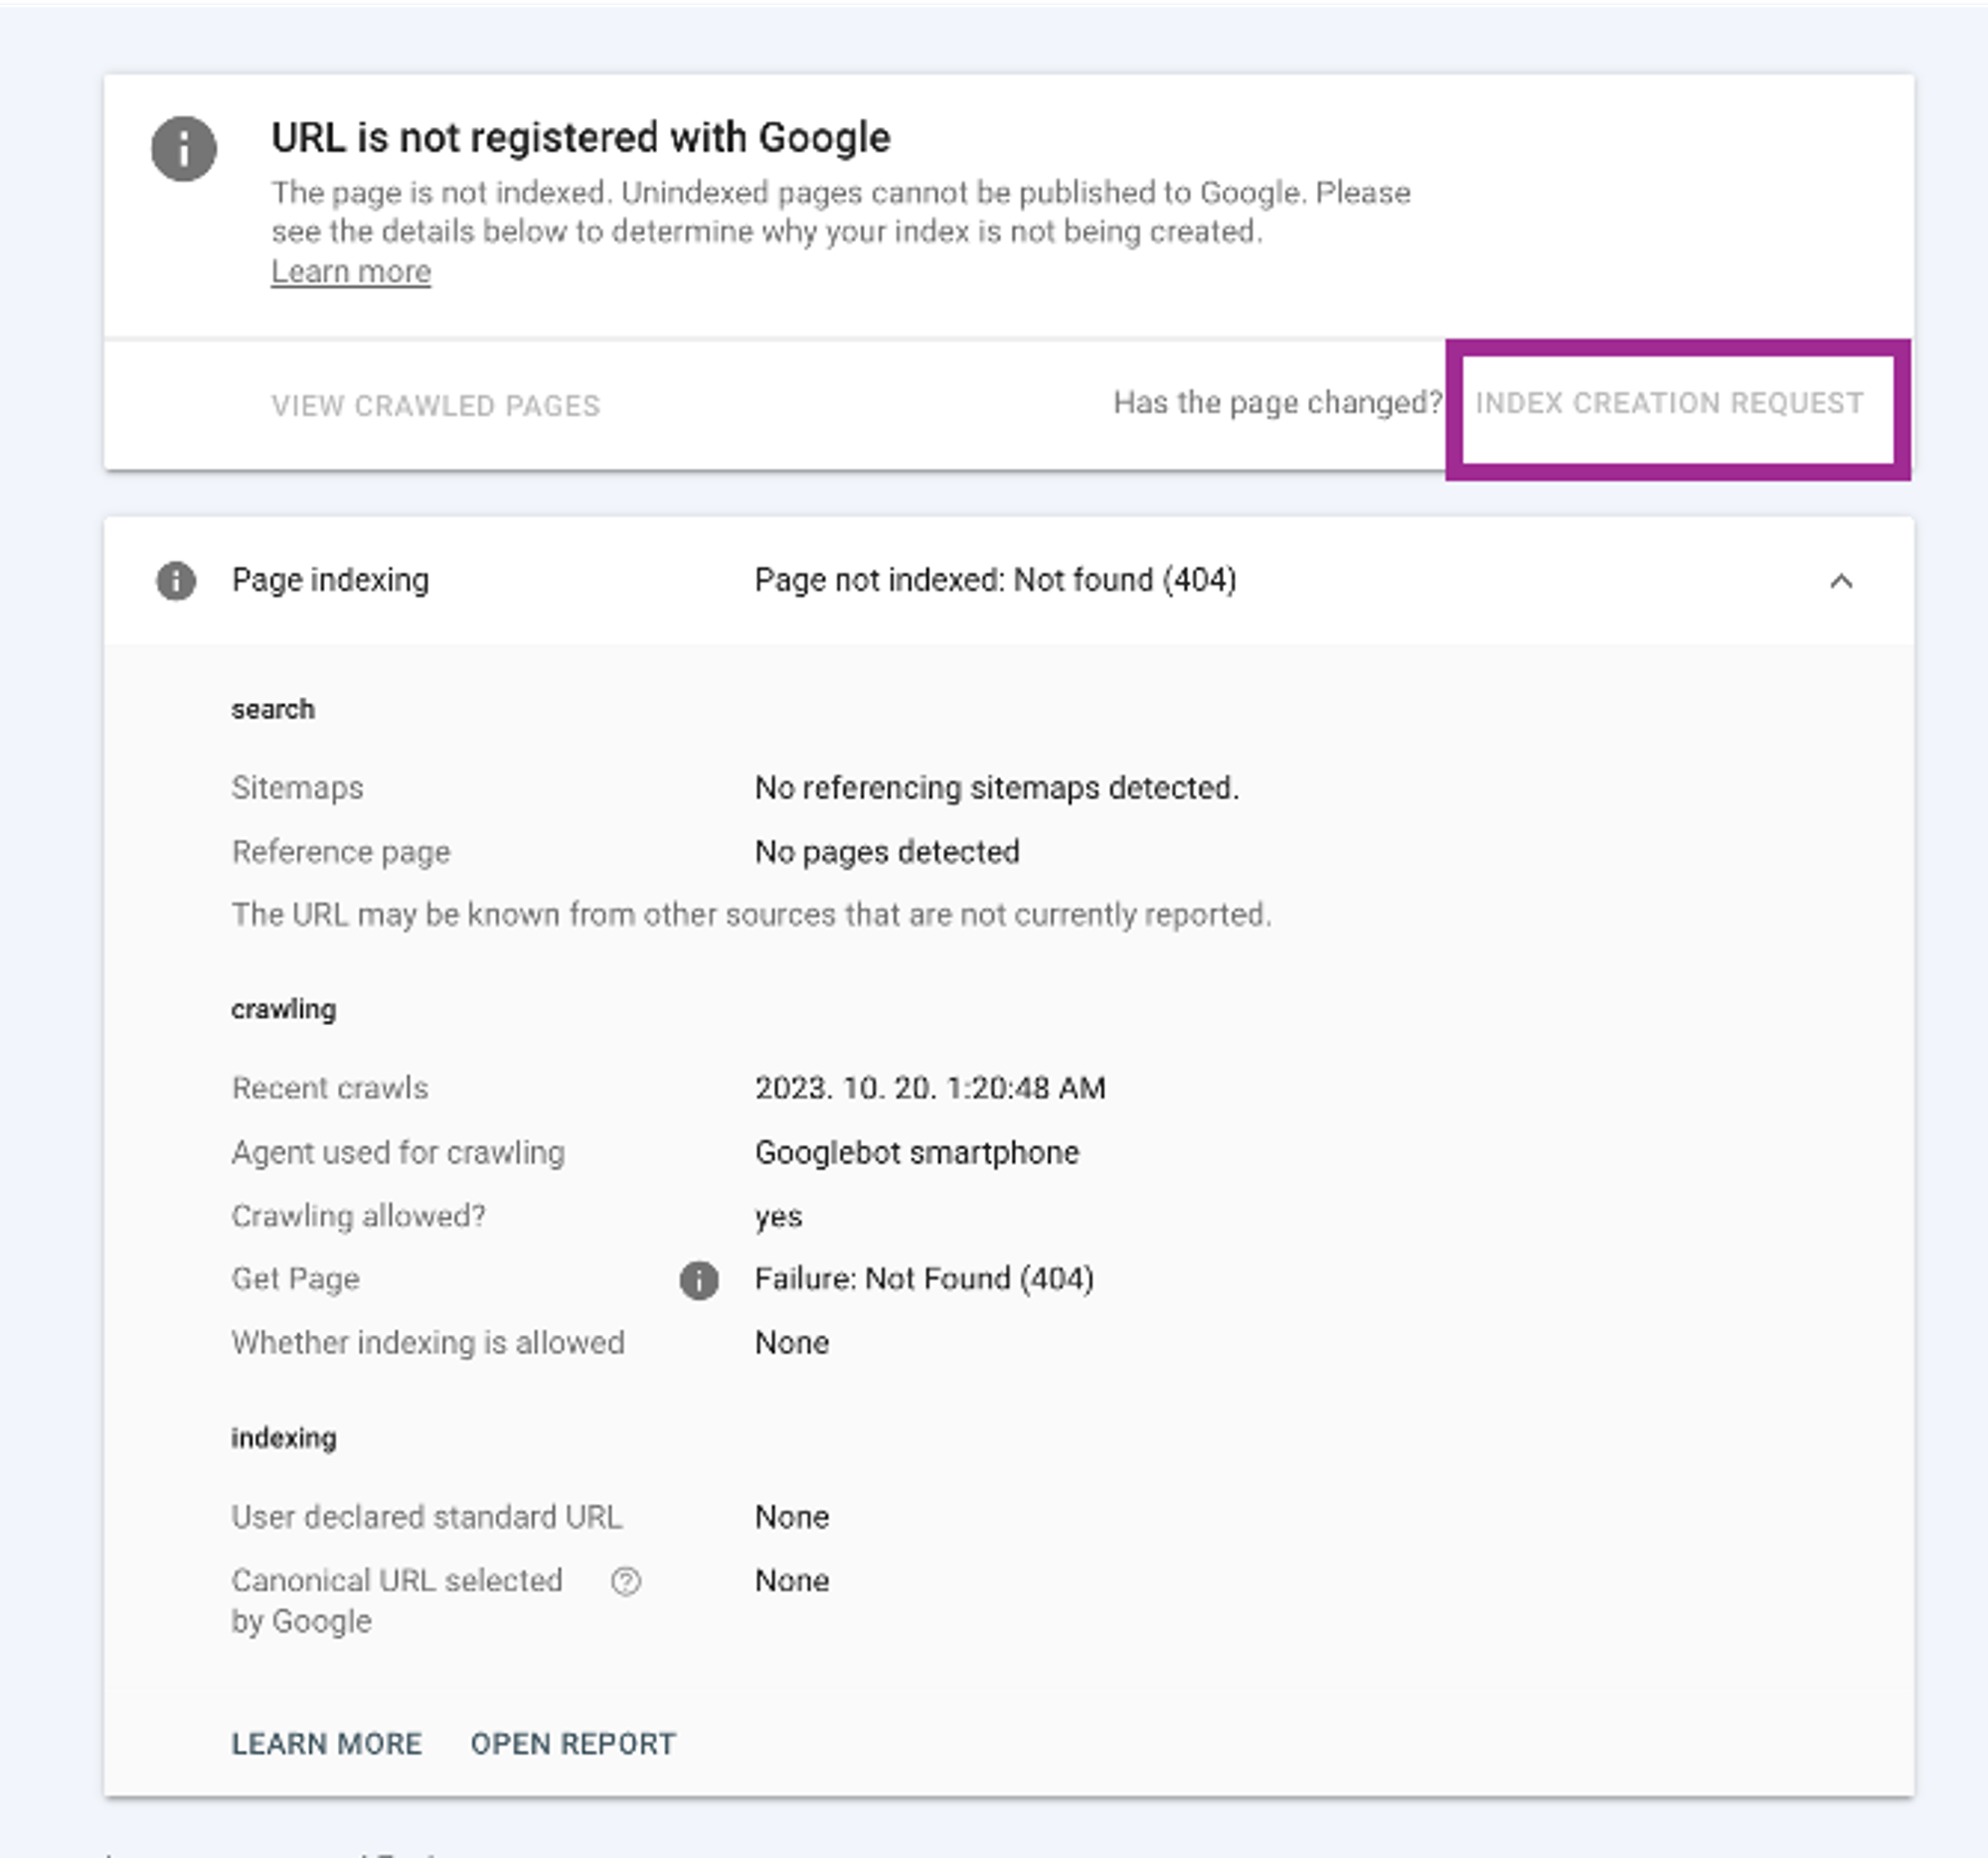 URL Inspection status

BubbleShare TIP
This is not a live test, and the results you see are from the most recently indexed version, not the version live on the web.
Analyze search performance data, including clicks, impressions, click-through rates, and average position, to understand how your website is performing in Google search results.
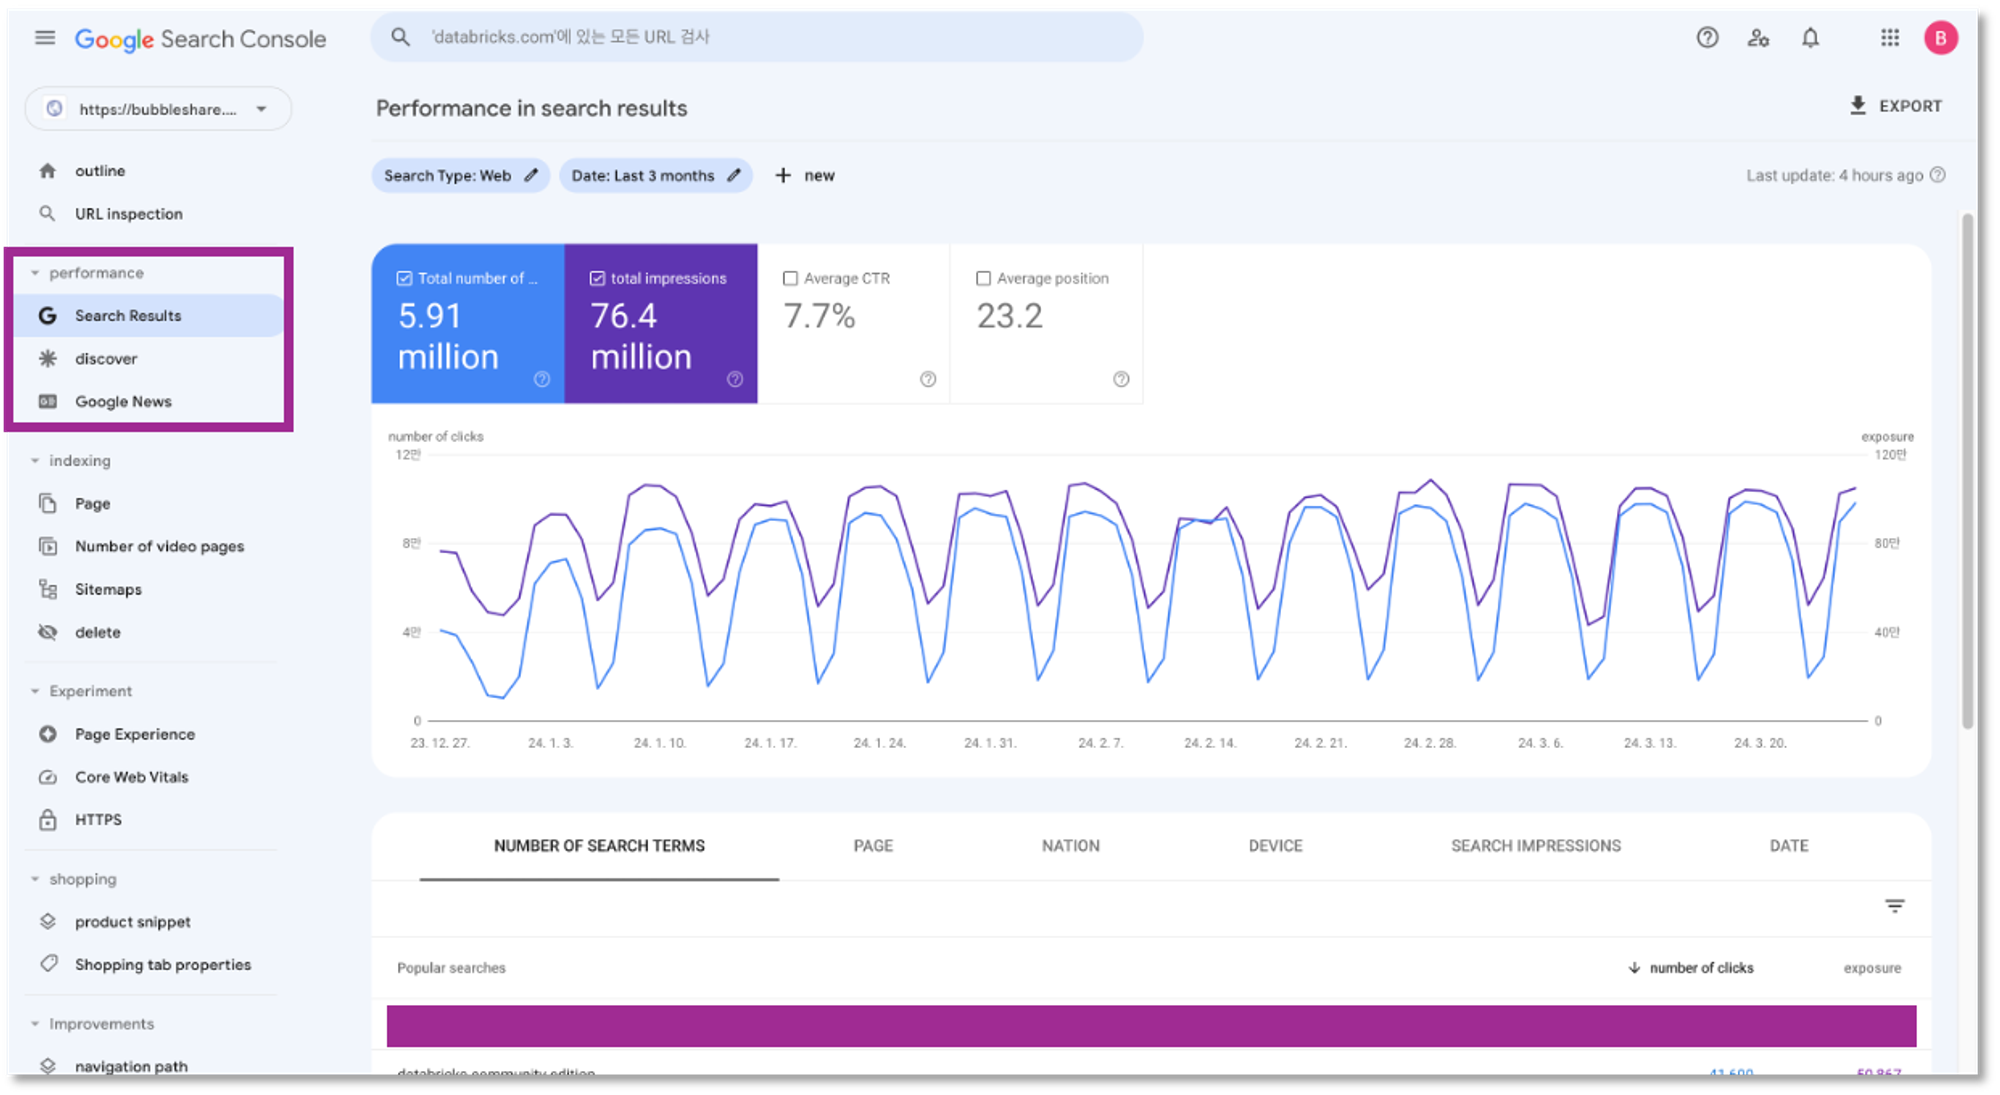 Performance status

BubbleShare TIP
If user enters the keyword ‘A’ into Google search and your site content is exposed 100 times and 3 of them are clicked, the CTR will be 3%. Therefore, content with a high CTR means it has the information searchers want.
Below the chart, you’ll see a table that shows which queries, pages, countries, and devices are driving traffic to your site.
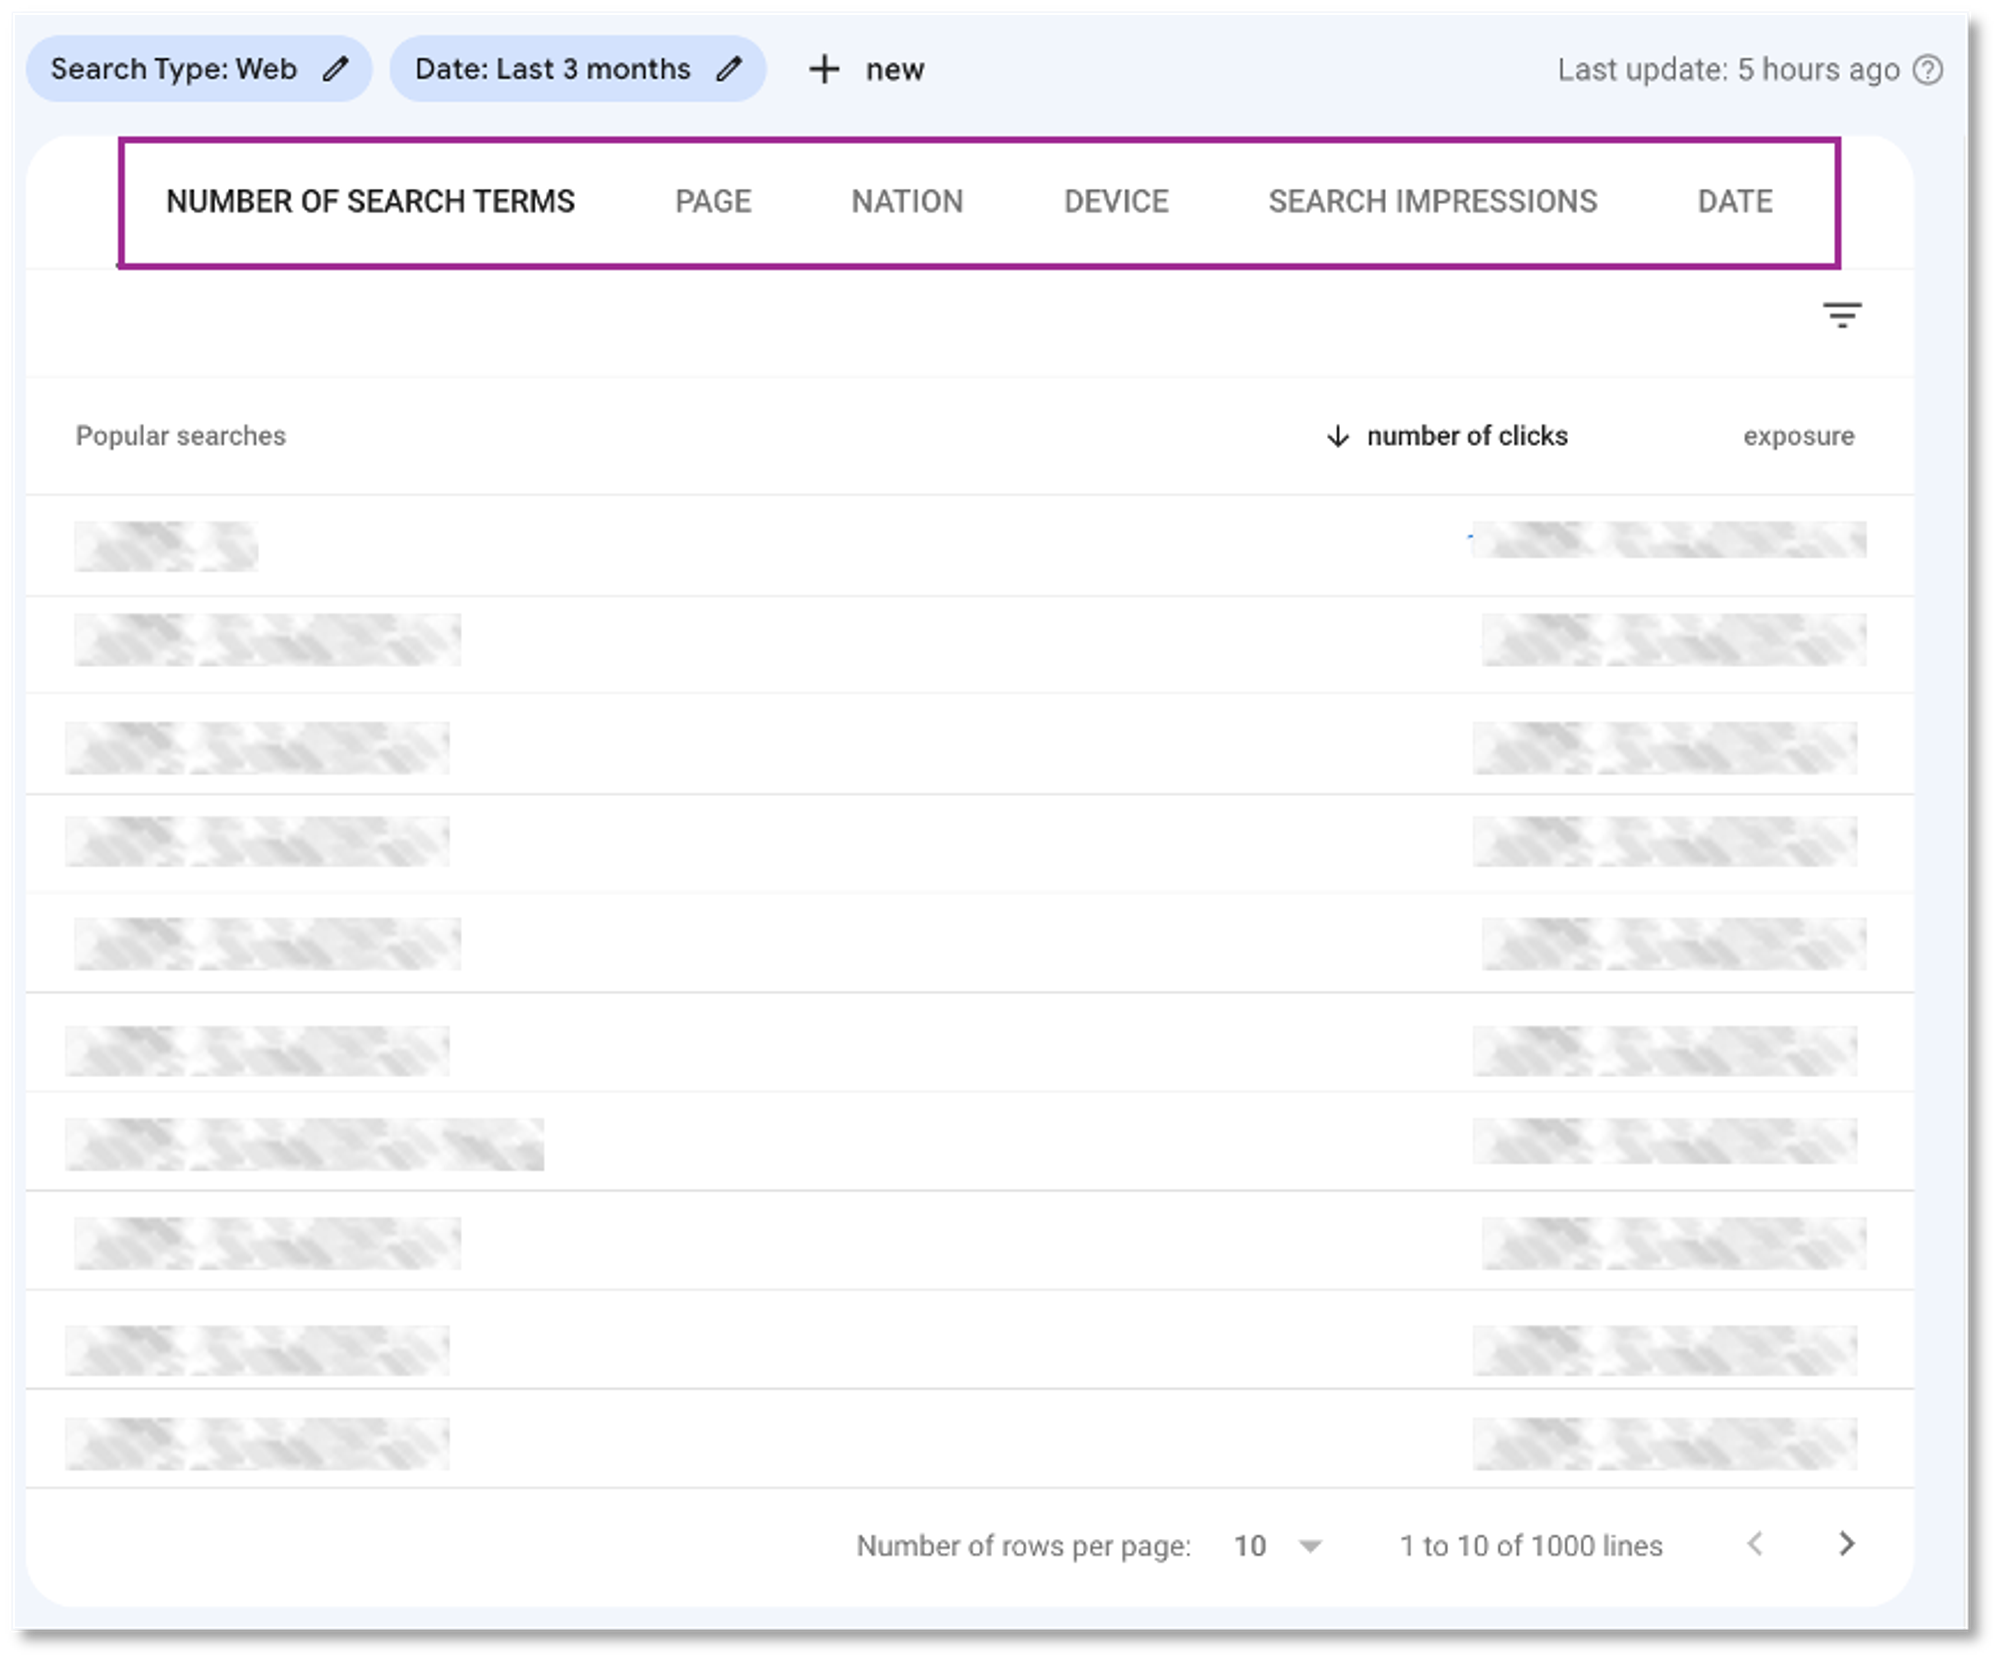 Performance list - Search terms, page, nation, device, search impressions, date
In addition, by using the indicators provided by Performance, you can determine the following improvements and proceed with content optimization:
If your website receives traffic from Discover and Google News, you’ll also see specific reports for these two segments.
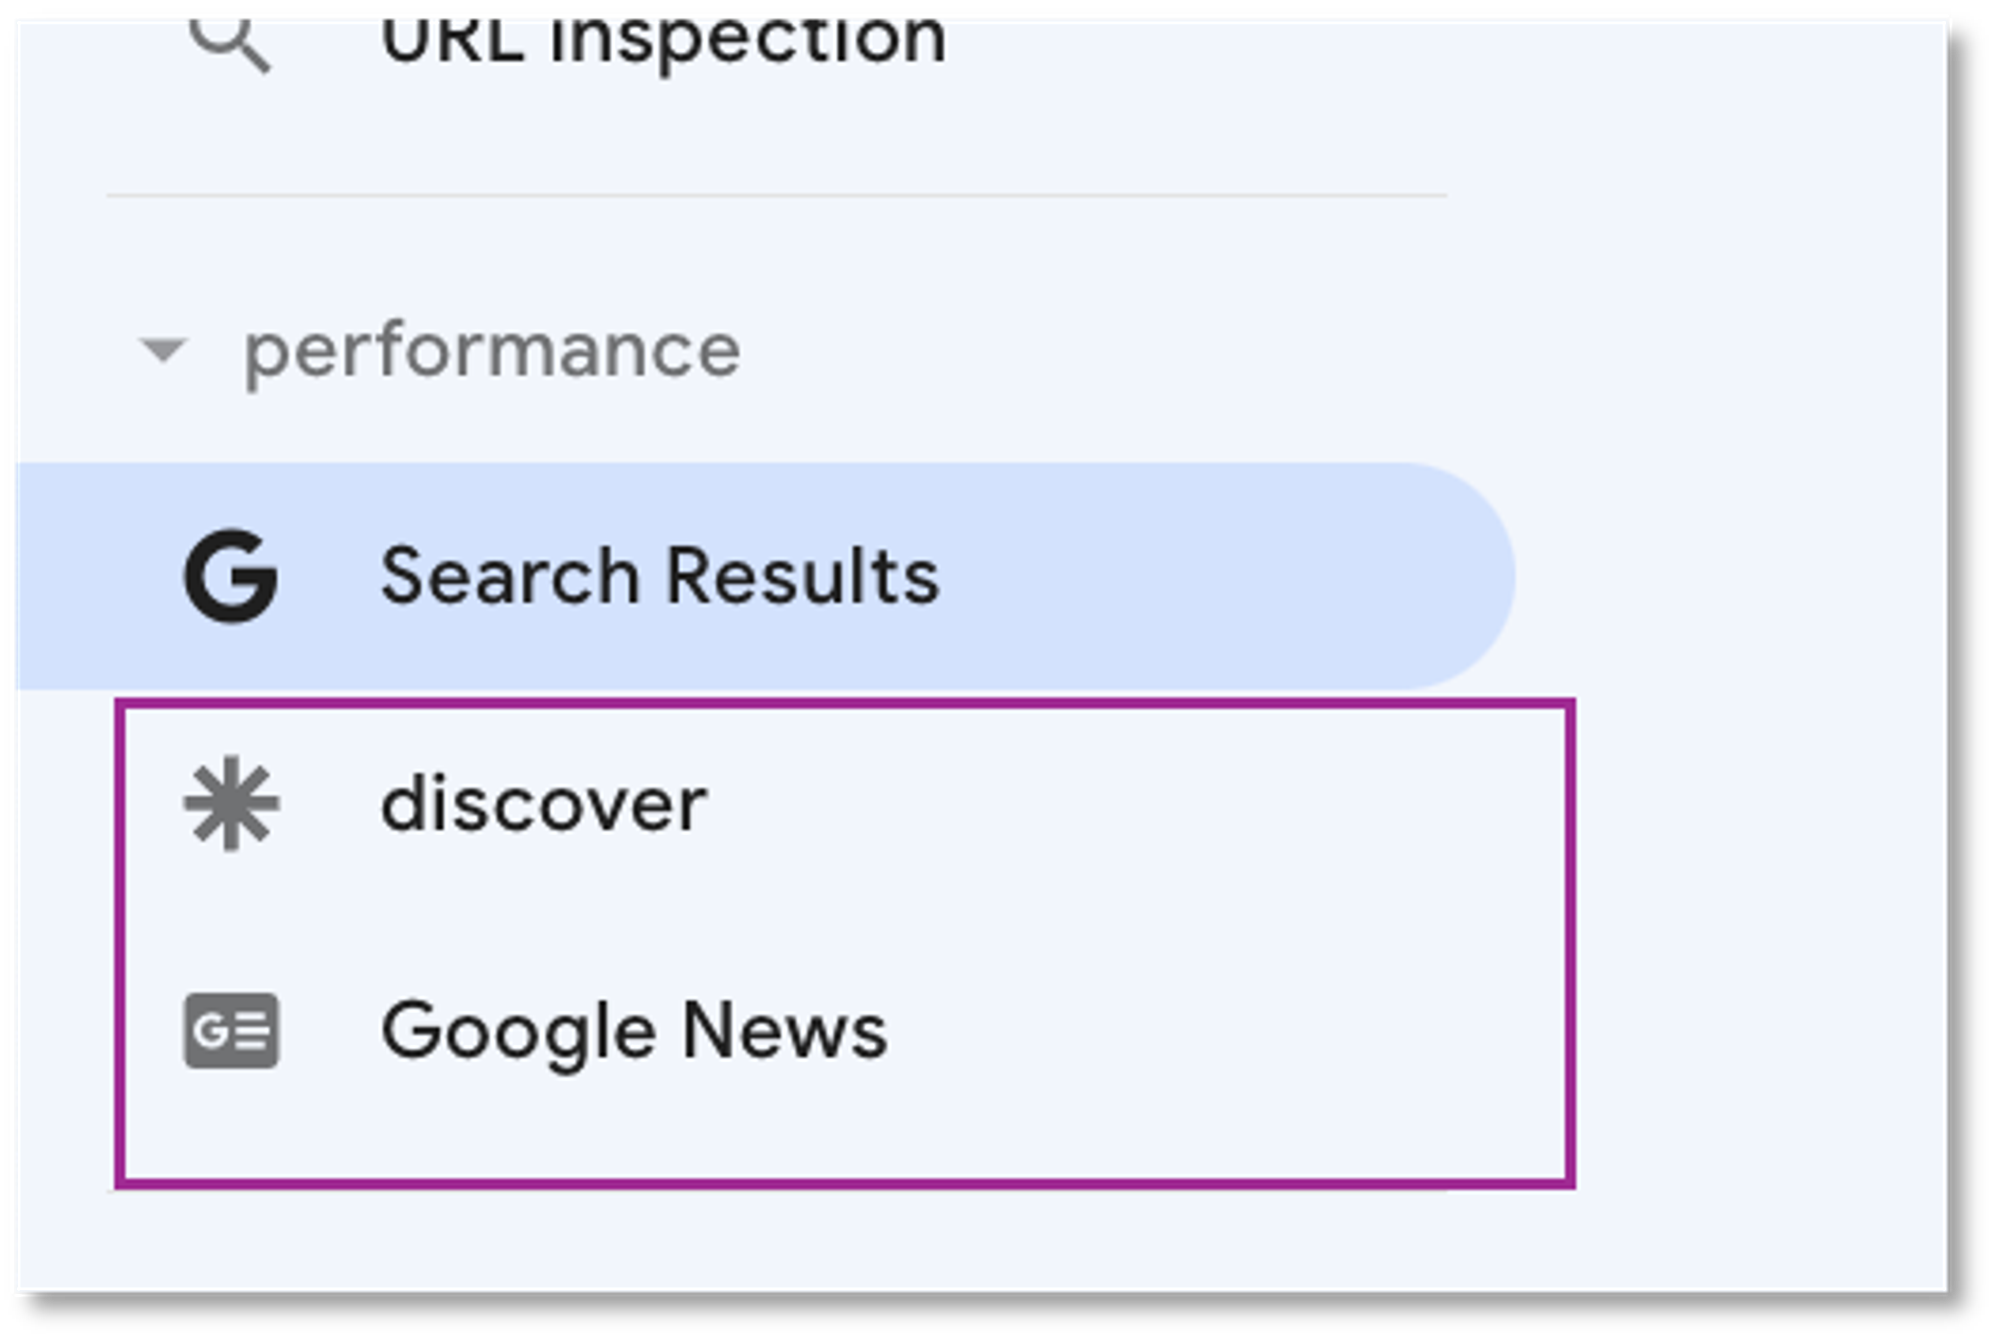 Performance - discover, Google news
The Page Indexing report shows the indexing status of all URLs that Google recognizes on your property. The report's "Top Summary Page" displays "Indexed Pages" and "Pages Requesting Indexing" and a graph. You'll also find a table showing "Why can't it be indexed" or "Other indexing improvements" for a URL.
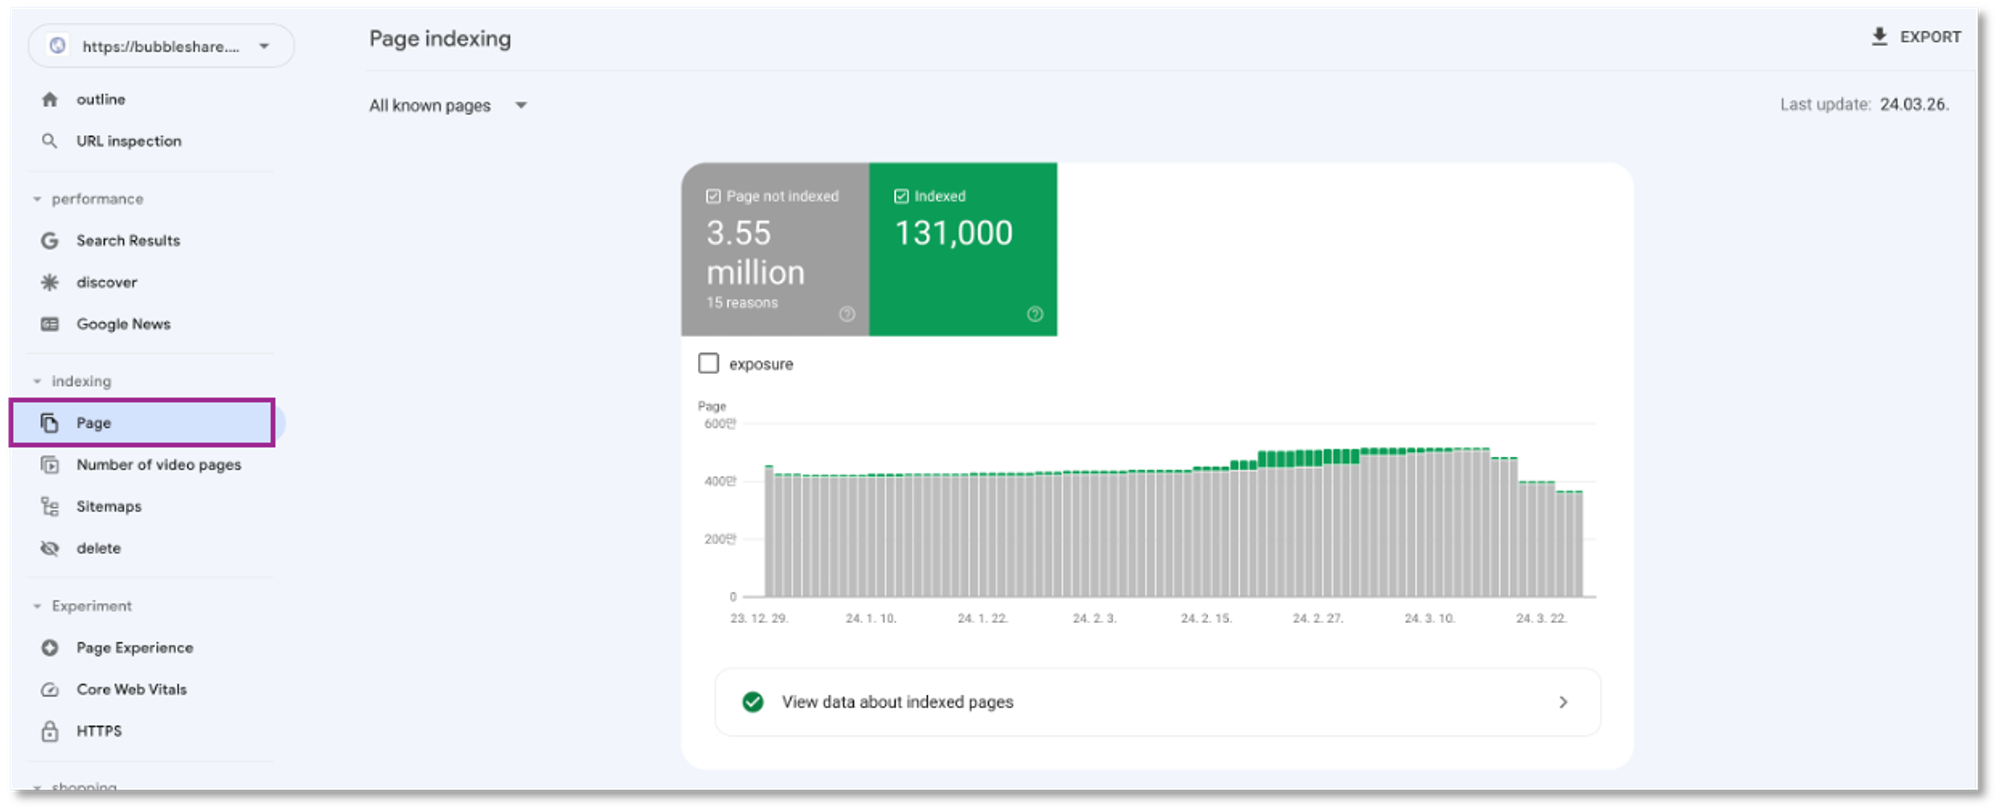 Page indexing
As your site grows, the number of indexed pages should gradually increase. If the number of pages suddenly increases or decreases, you can troubleshoot the problem by referring to the table below. The "Why isn't it indexed" table on the page is sorted by what we believe are the most important issues to address.
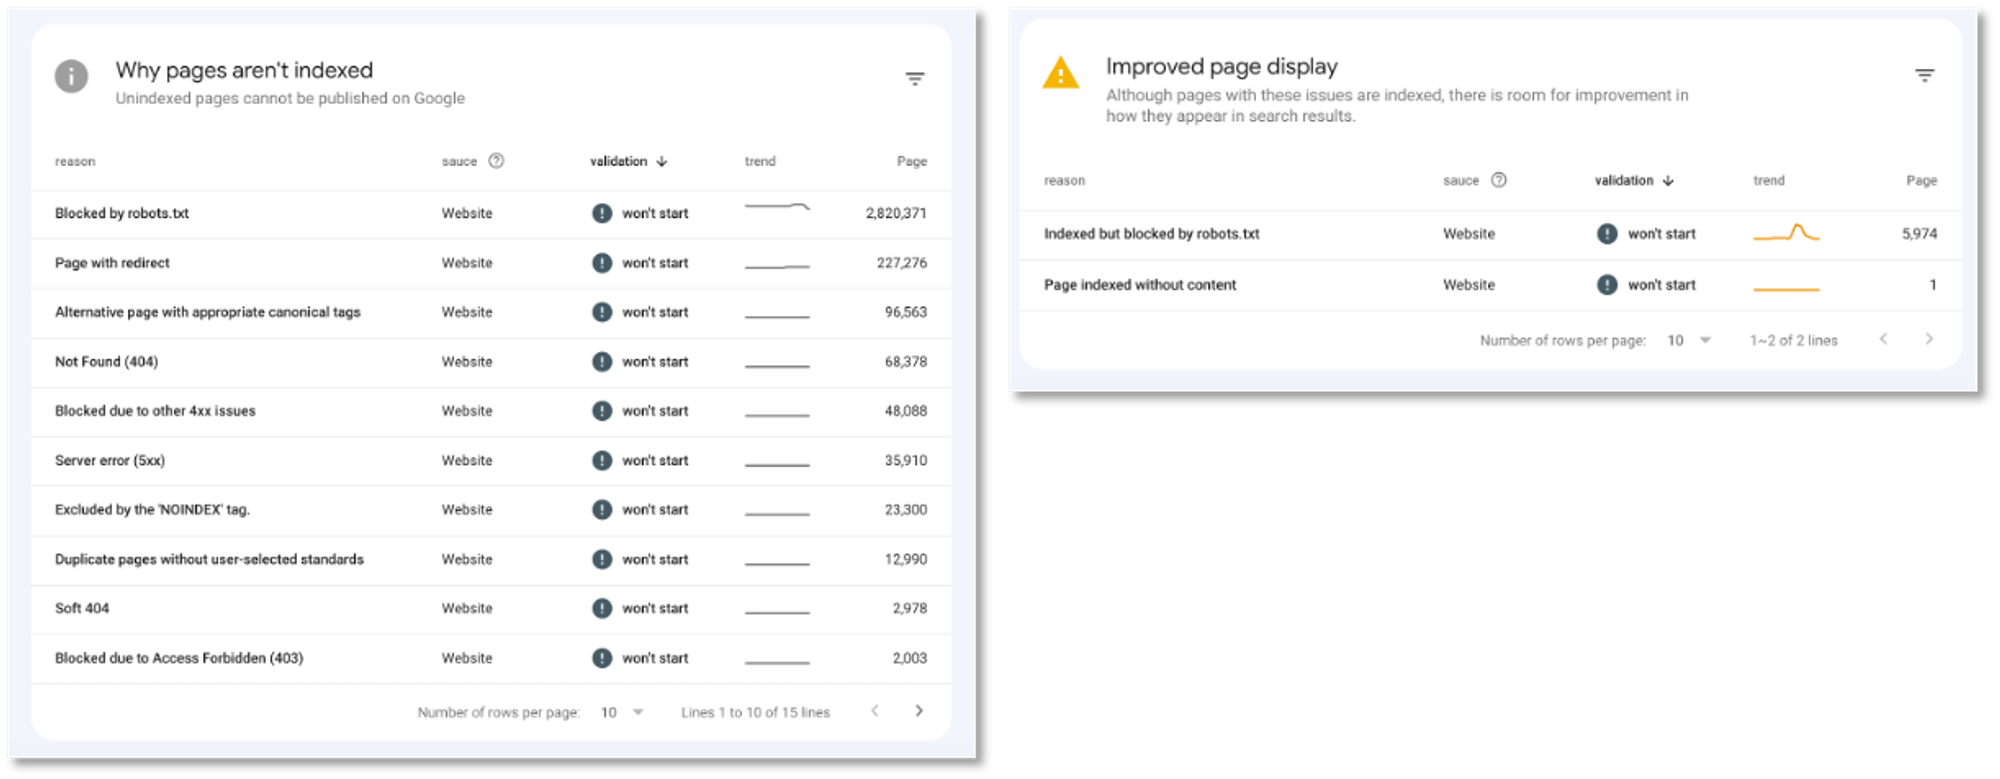 Page index status
Some of the most common indexing issues you may see in your reports are:
| Problem | Reason |
|---|---|
| Drop in total indexed pages without corresponding errors | It might be blocking access to your existing pages via robots.txt, 'noindex' or a required login. Look for a spike in non-indexed URLs that corresponds to your drop in indexed pages. |
| More non-indexed than indexed pages | If you see more non-indexed pages than indexed pages, look at the reason shown in the report. |
| Error spikes | Error spikes might be caused by a change in your template that introduces a new error, or you might have submitted a sitemap that includes URLs that are blocked for crawling by robots.txt, noindex, or a login requirement. |
| server errors | Googlebot was unable to access the URL, the request timed out, or the site was busy. As a result, Googlebot had to give up on the request. Check your site's host status in the Crawl Statistics report seeing if site availability issues reported by Google can be identified and corrected. |
| 404 errors | In general, we recommend fixing only 404 errors that you link to yourself or list in a sitemap. If a page has been moved, you should return a 3XX redirect to the new page. Learn more about evaluating and fixing 404 errors. |
By referring to the tables, you can determine the reason for not being indexed, whether there is a problem based on your indexing goal, whether it is a problem that can be solved based on the source value, and set up an environment so that your website can be exposed well on SERPs.

BubbleShare TIP
1. 100% Indexing: You should not expect every URL on your site to be indexed. Only standard pages are indexed, as described above. 2. Instant indexing: When you add new content, it may take a few days for Google to index it. You can reduce index creation delays by requesting index creation.
Read this article to learn about the basic technical setup of Google SEO and what metrics to check. By regularly monitoring and utilizing Google Search Console, you can optimize your website's better visibility in Google search results, user experience, and overall performance.